Sync Windows time with server
Run cmd as admin
Make sure the Windows Time service is running, then run the sync
net start w32 timew32tm /resyncEnable viewing hidden & system files
Explorer > View > Options > View
Select Show hidden files, folders and drives
Uncheck Hide protected operating system files
Start a task with higher permissions using shortcut key
This allows users with lesser permissions to run certain commands and applications as higher-privileged users. Configuration requires higher-privileged user access, but uses all native Windows options.
Get the command line of a task you want to run (applications, script, etc.)
Create a new scheduled task set to run with highest privileges (make sure it can be manually triggered and password storage is unchecked)
Create a shortcut file either on the user “%UserProfile%\Desktop” (this does NOT work with folder relocation like OneDrive’s Known Folder Move), “%AppData%\Microsoft\Windows\Start Menu\Programs”, or subfolders of the latter (including custom subfolders)
Give the shortcut a shortcut key in its Properties dialog
Note that if you move the shortcut file, you must re-bind the shortcut key
See also:
https://superuser.com/questions/57694/setting-a-shortcut-to-trigger-task-scheduler
Access another user’s registry hive
Turn on viewing system files in explorer
Run regedit as admin (or another user with access to the target user’s hive)
Select HKEY_USERS or HKEY_LOCAL_MACHINE
File > Load Hive
Load the user’s ntuser.dat file from %userprofile% (typically C:\Users\<username>)
Name the hive mount point
When done:
Select the hive mount point
File > Unload Hive
Get username from registry (or find username for user subkey)
Method One
Run regedit
HKEY_USERS\<user SID>\EnvironmentCheck the Path value for the user’s profile path
Method Two
Run regedit
HKEY_LOCAL_MACHINE\SOFTWARE\Microsoft\Windows NT\CurrentVersion\ProfileList\[<user SID>]Check the ProfileImagePath value for the user’s profile path
Special Cases
- The user’s SamAccountName attribute changed since the user profile was created on the local computer. User profile paths are retained (by design) and continue to function normally in most cases, though some software will errantly query user profile paths to determine usernames or assume a user profile path is the same as the username.
- Multiple users with the same username from different directories have logged in (e.g., a local user and AD/AAD user, users from different domains). Any users after the first will have the domain appended to the username in the path. In the case the user is a local user, the computer name is used since the computer maintains the relevant user directory.
Extracted archive is empty
Assuming the archive isn’t damaged/corrupted in some way, make sure hidden & system files are viewable. This applies to explorer.exe, CMD, and PowerShell in their default configurations (though you can set parameters in CMD & PS to show hidden & system files or let tab completion find it). Recursive searches will have varying results like CMD’s dir /s or PowerShell’s Get-ChildItem -Recurse will also neither find nor traverse these files and folders. Take note of the functionality in any file system viewing application, native or third-party.
For example: Create an archive of a user profile’s AppData folder on a Windows system and extract it on a different Windows computer using the native extractor. It won’t show up in a default configuration, since the AppData folder uses the Hidden attribute.
Working with files with attributes
Files and folders with the Hidden and/or System attributes are not visible in default configurations of explorer.exe, CMD, or PowerShell. Recursive searches will have varying results in different applications (e.g., while dir /s DOES NOT list hidden folders it DOES traverse them, and PowerShell’s Get-ChildItem -Recurse will neither list or traverse them). Take note of the relevant functionality in any file system viewing application, native or third-party.
Export & import wifi profiles
To export:
netsh wlan export profileThis creates an XML file in the current folder for each wireless profile in Windows.
To export with cleartext passwords (good for reading a password to manually enter elsewhere):
netsh wlan export profile key=clearTo import, run this command at the path with the previously exported XML files. This DOES NOT have to be run as admin.
forfiles /m *.xml /c "cmd /c netsh wlan add profile "@path""Well-known SIDs in Windows
Windows uses security identifiers, or SIDs, to uniquely identify security principals (users, groups, computer accounts, processes, threads, etc.) and determine which security principals have what type of access to entities such as files, folders, and registry keys.
Some SIDs are reserved for use by Windows and can never be used for other security principals. This keeps SIDs consistent for certain security principals (e.g., TrustedInstaller, SYSTEM, the Administrators group, etc.) across all instances of Windows.
See the below links for these SIDs, associated security principals, and more info on SIDs and the Windows security model.
https://learn.microsoft.com/en-us/windows/win32/secauthz/well-known-sids
https://renenyffenegger.ch/notes/Windows/security/SID/index
‘Net’ command bugs
Some net commands have annoying little bugs in or around them.
- net /add does not support names longer than 20 characters. You’ll have to use another method, such as a GUI, PowerShell, or VBS.
- net share does not support using spaces in new share names when using PowerShell. This is due to a function of PowerShell rather than net. If such is attempted, the command’s syntax will be returned as with any other syntax error.

There are a couple workarounds:- Run the command through cmd instead
- Pre-define the share name in a variable first, then use that variable in executing the net command
$name = "My Share"
net share $name=C:\
Restart clipboard service
Sometimes the clipboard in Windows just dies. You get errors trying to cut, copy, or paste. You can almost always clear it up by restarting the clipboard service. Its display name is “Clipboard User Service” with a few hexadecimal characters appended to it. The service name has the same hex, and the characters will vary, so scripting it will require grabbing that hex from wherever it’s from (don’t ask me where) or just filtering off the prefix.
You can do it with just CMD:
net stop cbdhsvc_<hex>
net start cbdhsvc_<hex>
…but it’s much easier to filter with PowerShell:
$service = Get-Service | Where-Object { $_.Name -like "Clipboard User Service*" }
Stop-Service -Name $service.Name
Start-Service -Name $service.Name
If you need to filter with CMD, good luck with that syntax.
Send Ctrl+Alt+Del over remote desktop
Use Ctrl+Alt+End to send the Ctrl+Alt+Del key combo over a remote desktop connection. This at minimum works in mstsc (the older RDP client built into Windows) and the newer Microsoft Remote Desktop client applications.
If you hit Ctrl+Alt+Del normally, the key combo is picked up by your local computer even when the remote connection is the focus window.
See some other key combos here, some or all of which still work to this day despite the post being from 2006.
https://blog.codinghorror.com/remote-desktop-tips-and-tricks/
Windows File Share troubleshooting
I’m no expert on Windows file shares, but I’ve overcome a few headaches with it.
- Only 1 connection can exist to a share from a client. It doesn’t matter which user tries to authenticate against the server. If a second attempt is made, the attempt will fail with the error “bad username or password” on the server. If you check the event logs, the sub-status code is 0xC0000064 which correlates to STATUS_NO_SUCH_USER. This is definitely not the actual problem, but it’s a sign of the real problem. I’ve also seen a Windows client not fully clear an existing session even after logging the user off. I had to do a full reboot.
- Share permissions are separate from file & folder permissions. If a user needs access to files and folders, those permissions need to be setup separately. Otherwise a user may be able to connect to a share but none of the actual contents.
- You don’t need to give the “Everyone” object full control to all things. You can find which exact permissions they need and apply them. There’s no shortage of vendors and software who claim a user needs administrative rights to run their software, but if you have the resources, it’s possible to lock things down granularly. This is unless, of course, the software makes a check for administrative permissions and refuses to even try if it can’t find them. That’s just bad software and can’t be worked around with granular permissions.
See also:
NTSTATUS values (for status & sub-status codes in Windows events)
Allow saved credentials in RDP connections with Windows Credential Guard enabled
Windows Credential Guard can, among other things, prevent saved credentials from being used in many scenarios. This impacts RDP connections with credentials saved to Windows Credential Manager as a Windows credential.
To bypass this, add a generic credential with the cmdkey command.
cmdkey /generic:TERMSRV/<targetNameOrIp> /user:<username> /pass:<password>
This trick is courtesy of TechnoCore at SuperUser. See the link below for details.
https://learn.microsoft.com/en-us/windows-server/administration/windows-commands/cmdkey
https://ss64.com/nt/cmdkey.html
Require password for RDS login
All of the methods below will require the user to provide their password regardless of whether their credentials were previously saved to the Windows credential store.
Method One
This edits the setting for all users connecting to a particular RDS via RDP using the Remote Desktop Connection client (mstsc.exe).
Edit this GPO setting on the RDS (or gateway in a farm scenario):
Computer Configuration\Administrative Templates\Windows Components\Remote Desktop Services\Remote Desktop Session Host\Security
Enable the policy named Always prompt for password upon connection
Although the policy is named after using a password and using the term in its description, it really means “always prompt for authentication upon connection”. For example, if Windows Hello for Business is configured on the connecting client for the initiating user, the user will be prompted for their PIN by default, although password can still be selected as an alternative authentication type.
https://admx.help/?Category=Windows_11_2022&Policy=Microsoft.Policies.TerminalServer::TS_PASSWORD
Method Two
This edits the setting for all .rdp file connections for a particular user’s context on a particular Windows device by default, but individual .rdp files may use the same setting to override the default setting.
Change the user profile’s Default.rdp (hidden by default) file at $env:UserProfile\Documents\Default.rdp to include this line:
enablecredsspsupport:i:0Method Three
This is the same as the above method, but only for the specified .rdp file. This can be useful if the target .rdp file(s) are in a location the user can read but not write to (e.g., the Public desktop with no admin rights for the user, SharePoint site synced via the OneDrive client with only view rights on the file(s), etc.).
Add the same line to the desired file(s):
enablecredsspsupport:i:0See also:
https://learn.microsoft.com/en-us/windows-server/remote/remote-desktop-services/clients/rdp-files
https://www.donkz.nl/overview-rdp-file-settings/
Force kill Windows Server RDS session
Sometimes broken terminal server connections don’t show appropriately in Server Manager. Whether it’s that or you’re running commands without a full interactive server logon, you can use these commands. You must be running at least Windows Server 2012.
qwinsta [/server:<ServerName>]or
query session [/server:<ServerName>]Shows all current sessions and their IDs on the specified server. The server it’s run on will be used if the /server parameter is omitted.
rwinsta [/server:<ServerName>] <SessionName or SessionID>or
reset session [/server:<ServerName>] <SessionName or SessionID>Force disconnects the session specified by either name or ID. This is the name and ID returned after the query. The server it’s run on will be used if the /server parameter is omitted.
logoff <SessionName or SessionID> [/server:<ServerName>Force logs off the session specified by either name or ID. This is useful when the session is successfully reset (disconnected) but the user remains logged on, as sometimes happens regardless of using the command line or Server Manager’s GUI. The server it’s run on will be used if the /server parameter is omitted.
See the links below for details, including nuance between rwinsta and reset session.
https://learn.microsoft.com/en-us/windows-server/administration/windows-commands/qwinsta
https://learn.microsoft.com/en-us/windows-server/administration/windows-commands/rwinsta
https://ss64.com/nt/query-session.html
https://ss64.com/nt/reset-session.html
https://ss64.com/nt/logoff.html
https://www.msnoob.com/how-to-remotely-force-kill-a-remote-desktop-session.html
Consume all CPU & memory on Windows
This can be useful for low-resource testing. These happen to be run in PowerShell, but similar solutions can be found with similar approaches in other languages.
CPU
This comes courtesy of Jaap Brasser as reported by Jeff Wouters in this blog post of his from 2012. It still works like a charm in 2023. Adjust to your liking for desired extent and duration of resource consumption, but take care to create multiple instances as needed. The loop will complete eventually, so if resources need to be consumed for a longer period, adjustments or another approach may be in order.
1..50|%{$x=1}{[array]$x+=$x}Memory
This is a quick solution from the accepted answer in a StackOverflow post on the topic. Size can be adjusted in a controlled manner much more easily than CPU usage. Once there’s a memory exception when running an instance of a line, the memory will stay consumed until the PowerShell instance is terminated.
$a = @()
$a += ("a" * 200MB)
$a += ("a" * 200MB)
...
Check raspberry pi temperature
Pis are made with cheap components to keep cost down, and operating temperature range is one of the trade-offs. Some components are rated up through 85 C, but some are only rated to 70 C. Upper 60s can cause some issues, like wifi drops.
GPU temp
vcgencmd measure_tempYou can monitor in real-time with the watch command.
watch -c -b -d -n 1 -- 'vcgencmd measure_temp'ARM temp (divide by 1000 to get C)
cat /sys/class/thermal/thermal_zone0/tempSee also:
https://www.cyberciti.biz/faq/linux-find-out-raspberry-pi-gpu-and-arm-cpu-temperature-command/
Fit raspberry pi display to screen
Pis more often need overscan values adjusted than screen resolution adjusted.
Run from terminal:
sudo nano /boot/config.txtEdit these values from whatever they are:
#overscan_left=10
#overscan_right=10
#overscan_top=15
#overscan_bottom=15
Uncomment the lines by removing ‘#’ at the beginning if needed.
Positive values SHRINK the physical space used by the video out.
Negative values EXPAND the physical space used by the video out.
See also:
https://www.opentechguides.com/how-to/article/raspberry-pi/28/raspi-display-setting.html
Change raspberry pi advanced display settings
If you can, avoid it.
If you can’t avoid it, read through these pages.
When working with the config.txt file, make a backup file first.
Raspberry Pi config.txt documentation (Ctrl+F for “hdmi”)
https://www.raspberrypi.com/documentation/computers/config_txt.html
Some forum page on creating custom HDMI modes
https://forums.raspberrypi.com/viewtopic.php?t=24679
A couple StackOverflow threads dealing with display problems
https://raspberrypi.stackexchange.com/questions/135025/no-hdmi-video-after-boot-sequence
Also take note of the [all] filter. Details are in the config.txt docs above.
Add domain to tenant-wide allow/block list in SharePoint Online
GUI
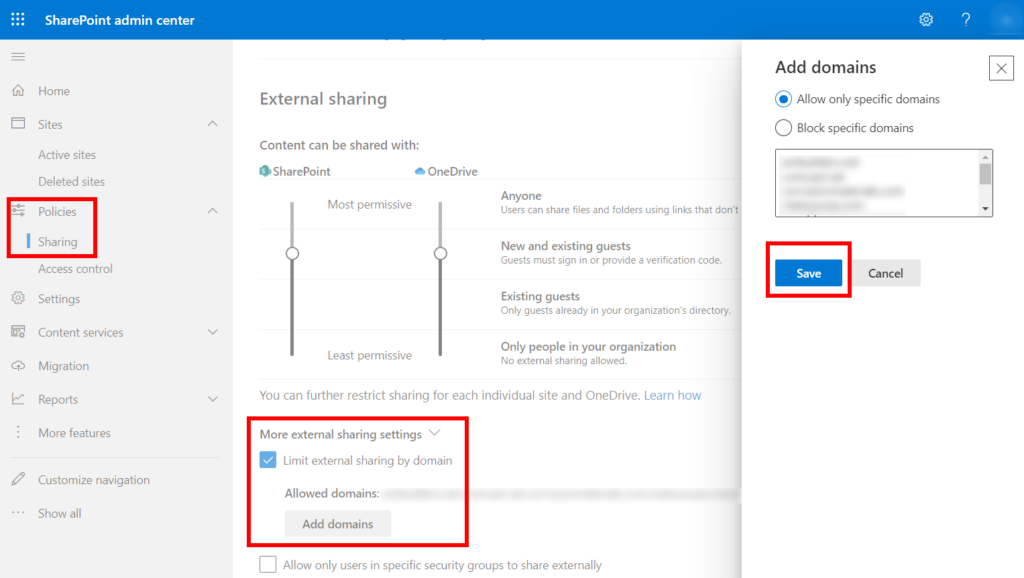
SharePoint Admin Center > Policies > Sharing page > More external sharing settings
Check the box to Limit external sharing by domain
Click Add domains button
Choose Allow only specific domains or Block specific domains
Add/remove domains from the list
Save
PowerShell
Install the SharePoint Management module if you don’t have it installed yet (run PS as admin)
Install-Module -Name Microsoft.Online.SharePoint.PowerShellConnect to your SharePoint’s administration site
Connect-SPOService -Url https://example-admin.sharepoint.comTo get the existing allow list:
(Get-SPOTenant).SharingAllowedDomainListTo get the existing block list:
(Get-SPOTenant).SharingBlockedDomainListIn either case, a simple string is returned using a single space as a delimiter. You can just copy that string, add or remove domains, and paste it back with whichever command fits:
Set-SPOTenant -SharingAllowedDomainList "domain1.com domain2.net [...]"Set-SPOTenant -SharingBlockedDomainList "domain1.com domain2.net [...]"The limit in either case is 3,000 entries.
See also:
https://learn.microsoft.com/en-us/powershell/sharepoint/sharepoint-online/connect-sharepoint-online
Mouse moves with keystrokes
- Check if Mouse Keys was accidentally turned on
- Check any custom key bindings (such as AutoHotKey)
- Close Paint. There’s an odd bug in mspaint.exe where the mouse can move around the screen when the arrow keys are pressed. Example below. I believe the area of the screen and the distance across which the mouse moves is tied to the bugged instance’s canvas size and position onscreen, but it’s so rare for me, and I haven’t been able to replicate it on command to really test it. It likely stems from Paint’s function of using the arrow keys to navigate the cursor across the canvas.
Outlook fails to preview PDFs when Adobe Acrobat is installed
If Outlook is failing to preview PDFs within itself despite the PDF Handler being enabled, and Adobe Acrobat (whichever version between Reader, Standard, or Pro) is installed, check whether Outlook & Acrobat are installed as 32-bit, 64-bit, or a mix. If it’s a mix (e.g., 64-bit Outlook with 32-bit Acrobat), the preview may fail no matter what you do.
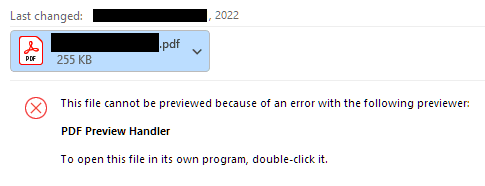
There used to be an issue with this that Adobe resolved in an update, but I’ve seen it persist in configurations even after updating. That fix was to change the following registry key:
HKEY_LOCAL_MACHINE\SOFTWARE\Wow6432Node\Classes\CLSID\{DC6EFB56-9CFA-464D-8880-44885D7DC193}by changing the AppId value’s data to {534A1E02-D58F-44f0-B58B-36CBED287C7C} (retaining the braces).
If the issue persists past a reboot, the only real fix I’ve found is to uninstall Acrobat and reinstall as whichever Outlook is installed as, 32-bit or 64-bit. If both versions of Acrobat are installed, Outlook can still revert behavior to the same issue again.
If 64-bit Acrobat is installed and then 32-bit Acrobat is removed, the problem may persist until 64-bit is reinstalled (or repaired) and the computer is restarted. I’m not certain, but my best guess is that the 64-bit install/repair process takes over or deletes some orphaned registry keys related to 32-bit Acrobat.
Files are sometimes unavailable in cmd or other applications
This may be due to an unavailable network location, such as a mapped drive, OneDrive, Dropbox, etc. The solution is to simply make the file available by reconnecting to the service or moving a copy of the file to an accessible location before running the command or script again.
For example, OneDrive’s default configuration is to only download files as they are accessed. This can come into play when signing into OneDrive on a new Windows device for an existing OneDrive instance. Accessing through some programs, such as cmd and its commands, may not prompt OneDrive to download the file. Instead, it sees them as unavailable.
The error messages may vary depending on the command being run, ranging from descriptive to entirely incorrect. For example, if you’re disconnected from OneDrive and referencing an online-only file from netsh, you may receive the following error:
An attempt as made to load a program with an incorrect format.
Below shows before and after downloading the referenced file via the OneDrive client:

Windows Update troubleshooting
A few commands to run or toss in a script (yoinked from some nice troubleshooting done here):
dism /online /cleanup-image /scanhealth
dism /online /cleanup-image /checkhealth
dism /online /cleanup-image /restorehealth
sfc /scannow
net stop wuauserv
net stop cryptSvc
net stop bits
net stop msiserver
Ren C:\Windows\SoftwareDistribution SoftwareDistribution.old
Ren C:\Windows\System32\catroot2 Catroot2.old
net start wuauserv
net start cryptSvc
net start bits
net start msiserver
chkdsk
esentutl /g %systemroot%\system32\catroot2\{F750E6C3-38EE-11D1-85E5-00C04FC295EE}\catdb
You can check logs at C:\Windows\Logs\CBS and in the Event Viewer under Windows Logs > Setup.
Enable hibernation in Windows
Open Control Panel > System and Security > Power Options > Change what the power buttons do
At the top of the power buttons panel, click Change settings that are currently unavailable, check Hibernate, and Save changes.
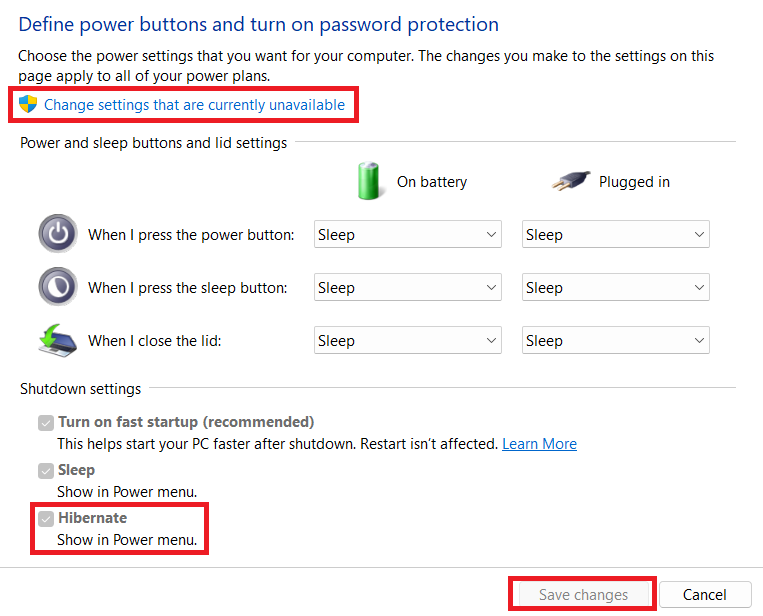
If Hibernate is NOT listed as a box you can check, perform the following to make it available, then go back to check the box.
- Run cmd as admin
- Run powercfg /hibernate on to switch on hibernation
- Run powercfg /hibernate /type full to create the hiberfil.sys
Note that this requires free disk space at least 40% the size of your total memory to create the hibernation file. This is both the minimum and default size in Windows 10 & 11 (75% in Windows 7), but you can customize the size to be larger and other parameters as desired.
Change power plan values which cannot be changed in the GUI
Sometimes Windows won’t allow you to change some power plan settings. For example, sometimes the “critical battery level” in Advanced Power Settings can be changed in the value field, then immediately after clicking away from that field, the value will revert.
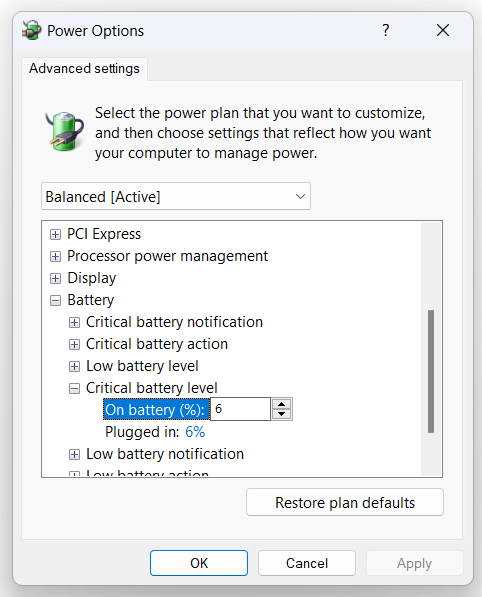
When the GUI fails, the command line can still save the day with powercfg. Note the following:
- Windows power options can be ignored in favor of third-party power management applications, GPO, or other avenues.
- Most commands will need to be run as admin.
- Parameters can often have ‘/’ or ‘-‘ used interchangeably, but not always.
- Many GUIDs are standardized by Microsoft, but some may be custom for third-party applications.
Several power options can be changed using powercfg, but Microsoft’s documentation can be sorely lacking both within the application’s help and online. If you know the name powercfg and what you want to do though, Google can get you the rest of the way. Commands to change are generally structured as such:
powercfg [-setting_to_change] [scheme_GUID_or_alias] [subgroup_GUID_or_alias] [power_setting_GUID_or_alias] <value>For any non-standard GUIDs currently in use by your system, you can query them by running this:
powercfg /q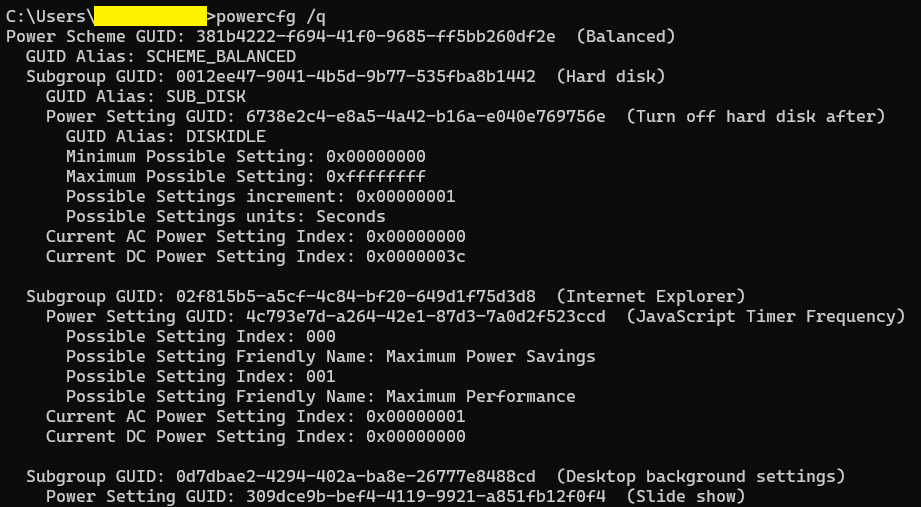
To change the critical battery level listed in the GUI screenshot above to 10% in the current power scheme, do the following. (If you need to change it for the value while plugged into power as well, just change out DC for AC. This works for several options.)
powercfg -setdcvalueindex SCHEME_CURRENT SUB_BATTERY BATLEVELCRIT 10See also:
https://learn.microsoft.com/en-us/windows/win32/power/power-setting-guids
https://www.thewindowsclub.com/reserve-battery-critical-battery-level
Exchange or Outlook rule continues to run even after changing
I’ve seen this with email forwarding rules more than anything. If the same type of rule goes through too many changes, the rule likes to corrupt itself. Exchange does this really cool thing with corrupted rules where it recognizes the rule is corrupt and does nothing about it. No alerts to users or administrators, no auto-disable, no restore from backup (even in Exchange Online), nothing. It’s up to you to find the corrupted rule and delete it. It can be recreated after as needed by normal methods.
Corrupted rules are only easily visible in PowerShell. After connecting to Exchange (Microsoft’s documentation here), run the following command.
Get-InboxRule -Mailbox <SMTP address> -IncludeHiddenAny rules returned with a hyphen in front of the name are rules Exchange has detected as corrupted. It can be removed with the following command.
Remove-InboxRule -Mailbox <SMTP address> -Identity <RuleIdentity>A couple things to note:
- Inbox rules can take precedence over transport rules in some circumstances. I haven’t done a lot of testing on it, but be aware.
- Rules aren’t always laid out like as you would expect. For example, if forwarding for a mailbox is applied from the Exchange Online Admin Center GUI, this does not create an inbox rule or transport rule. This instead sets existing properties on the mailbox, such as:
- ForwardingAddress
- ForwardingSmtpAddress
- DeliverToMailboxAndForward
See also:
https://o365info.com/forward-mail-powershell-commands-quick/
Microsoft Teams service does not work for recently unblocked user
If you unblock/re-enable a user in Azure AD or Microsoft 365 in general, their Teams services can take a while to restore to full functionality, even a full day or longer. This can impact not only their use, but also others’ use of Teams services as they related to the recently re-enabled user, such as directory listings.
Whether you need to block a user temporarily while they perform a password reset after a potential compromise, as part of a user onboarding (blocking sign-in before officially granting access), the user is on extended leave, or any other reason, this is a potential concern.
https://practical365.com/disable-azure-ad-accounts-teams/
SSO vs. Seamless SSO
SSO (single sign-on) is when you can use the same account to login to multiple services.
Seamless SSO is a feature of Azure Active Directory Connect which allows for SSO with the added benefit that authentication against other services is automatic. The user does not need to provide any credentials.
While SSO can certainly allow for automatic authentication to multiple services, it DOES NOT require that capability. You don’t need to be able to sign into something once and have everything else be automatic. You just need to be able to use the same identity across multiple services.
It may be a basic difference, but I learned this incorrectly originally and still get mistaken on it a frustrating amount of the time.
See below for info on Seamless SSO:
https://learn.microsoft.com/en-us/azure/active-directory/hybrid/connect/how-to-connect-sso